

David's
<Tech Repair\>
Your friendly neighborhood IT Guy
davidstechsupport
Settings managed by your organization

What causes this issue
This error can be caused by a few things:
-
Viruses and malware
-
Third party programs interfering with Windows settings
'Some settings are managed by your organization' can also be active on the system if the system is part of a company or school organization, this means that it is not an error but set up for the organization.
NOTE:
If you are getting this error on a school or company computer, contact the administrator for help before using this guide, I am not responsible if you use this page to access settings that were blocked off by the administrator.
Why you should remove it
You should get this error removed from your computer because it limits the settings that you can toggle, limiting the 'personal' aspect of 'personal computer'
Although some settings are usually left alone (like time/date), there are some settings that will be blocked that you may want to toggle such as:
-
Privacy
-
Some customizations
-
Can even block browser settings and webpages
I am here to help you solve this issue, I have encountered this only a few times and have been able to remove the error each time using the methods below
The methods
The following methods will be used to remove the annoying "Some settings are managed by your organization" error.
-
Changing the diagnostic data settings
-
Editing the 'Local group policy editor'
-
Modifying the Registry editor
-
Deleting the error causing Registry strings
-
Changing the Telemetry settings in Registry editor
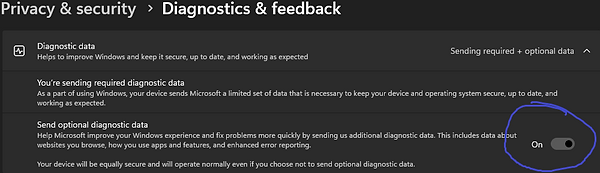
Diagnostic Data Settings
The diagnostic data is what Microsoft uses for improving windows through updates and keep it up to date, some settings may be disabled causing this specific error to appear.
In order to adjust the diagnostic Data, you will need to do the following:
Step 1.) Open settings
Open start>Select Settings or press the Windows key + I
Step 2.) Now select 'Privacy and Security' on the left panel, then select 'Diagnostics & Feedback' on the right panel
Step 3.) All you need to do now it make sure the 'Send Optional Diagnostic Data' option is set to "on"
All that's left is to restart the computer to test if this method removed the issue.


Local Group Policy
The Local Group Policy is a collection of settings that control the computer and user configurations on the system.
Editing the policy is easy and I'll show you how to open it and what you'll need to change.
Step 1.) Open the Group Policy Editor (GPE)
Press Windows Key + R to open run
type "gpedit.msc" then press enter
If you are unable to open GPE, you either do not have administrator privileges, or you are running Windows Home.
You can download the Group Policy Editor here:
Another option would be to upgrade your edition of Windows to Windows (10 or 11) Pro or higher, check out my page explaining the different versions, which one is right for you, and how to upgrade/where to purchase
Alright, back to the guide
Step 2.) With Gpedit opened, locate "Allow Diagnostic Data"
Heres how: (refer to image on left)
-
Expand Computer configuration
-
Expand Administrative Templates
-
Expand Windows Components
-
Select Data Collection and Preview Builds
-
Right-click Allow Diagnostic Data
-
Select Edit
Step 3.) You will need to do the following:
-
Set the status to "Enabled"
-
Change the option to "Send optional diagnostic data"
-
Click APPLY then OK
Now restart your computer and see if this solved the issue

Modifying the Registry
This will require going into the Registry and deleting a specific key in a string, this is separated from the "Removing Registry strings" method because doing both methods at the same time could result in damage to the computer.
This will only take a few steps
Step 1.) Open the Registry Editor
Open Start>Search Regedit>Run as administrator
Step 2.) In the registry, go to the following key:
HKEY_LOCAL_MACHINE\Software\Policies\Microsoft\Windows\WindowsUpdate
Step 3.) Right-click the 'Wuserver' key and delete it
That's it, now close the registry and restart the
computer to check for the error

Removing Registry Strings
Just like the previous method, this one consists of deleting registry keys, I will be using the Command Prompt for this solution because it speeds up the process rather than manually searching the Registry
Step 1.) Open the Command Prompt
Open Start>Search CMD>Run as administrator
Step 2.) The following keys will need to be deleted from the system, type or copy/paste then press enter for each key, one at a time. There are a total of 11 keys that will need removed
Example: reg delete "REGISTRY KEY" /f (Press enter)
NOTE: Some may say something like "Incomplete search, couldn't locate, or something similar. Don't sweat, this is common, it's even happened to me, there will not be an issue unless every key says something like that.
reg delete "HKCU\Software\Microsoft\Windows\CurrentVersion\Policies" /f
reg delete "HKCU\Software\Microsoft\WindowsSelfHost" /f
reg delete "HKCU\Software\Policies" /f
reg delete "HKLM\Software\Microsoft\Policies" /f
reg delete "HKLM\Software\Microsoft\Windows\CurrentVersion\Policies" /f
reg delete "HKLM\Software\Microsoft\Windows\CurrentVersion\WindowsStore\WindowsUpdate" /f
reg delete "HKLM\Software\Microsoft\WindowsSelfHost" /f
reg delete "HKLM\Software\Policies" /f
reg delete "HKLM\Software\WOW6432Node\Microsoft\Policies" /f
reg delete "HKLM\Software\WOW6432Node\Microsoft\Windows\CurrentVersion\Policies" /f
reg delete "HKLM\Software\WOW6432Node\Microsoft\Windows\CurrentVersion\WindowsStore\WindowsUpdate" /f
You might not have to restart the system for this solution to take effect, but I still recommend it
Telemetry Settings
This method will use both the Registry Editor and the Serivices, I will walk you through how to change the Telemetry data information and how to enable it
Step 1.) Open Regedit
Open Start>Search Regedit>Run as administrator
Step 2.) Navigate to the following key:
Computer\HKEY_LOCAL_MACHINE\SOFTWARE\Policies\Microsoft\Windows\DataCollection
Step 3.) Right-click the DWORD string called "AllowTelemetry" and select 'Modify'
If you need to create the AllowTelemetry string
Step 4.) Change it's value data to 1
Now we will be using the Services program to enable the Telemetry service and set it to start when the computer starts up
Step 5.) Open the Serivces program
Open RUN (Win Key+ R)>Search Services>Run as administrator
Step 6.) Locate the service called "Connected User Experiences and Telemetry" and double-click it to open its settings
Step 7.) You will need to do the following in the telemetry settings:
-
Go to its general tab
-
Set the startup type to 'Automatic' not the delayed startup one
-
Start the service (if it's not already)
-
Select OK
Now thats all you need to do, restart the computer and check for the error
To create a new string:
-
Right click on an open space in the right panel
-
Select new, then DWORD (32-bit) value
-
Name the string "AllowTelelmetry"
-
Select OK


